
Welcome back to our series where we teach an absolute beginner Microsoft Dynamics 365 Finance and Operations from scratch! In this lesson, we’re diving deep into SQL fundamentals, the foundation of how data is stored, queried, and manipulated in D365. This was nearly a two-hour session where we jumped between SQL Server Management Studio, the D365 interface, and Visual Studio to understand how these tools connect.
Setting Up Your Environment
Before we begin, make sure you a ONEBOX or Cloud hosted dev box with SQL Server Management Studio open and connected to your database. In these lessons, we’ll be working with the AXDB database, which is the main operational database for D365 Finance and Operations. When you open a new query window in SSMS, you’ll see the database name displayed next to the green Execute button; this confirms which database your queries will run against. Remember to check that you are running queries against the correct database.
Understanding SQL Syntax
One quick note before we dive in: SQL is not case-sensitive when it comes to keywords and table names. This means SELECT, select, and SeLeCt are all treated the same by the database engine. However, for readability and professional standards, most developers use uppercase for SQL keywords (SELECT, FROM, WHERE) and follow the existing capitalization conventions for table and field names as they appear in the system. This makes your code easier to read and maintain, especially when sharing queries with colleagues. Since Derek is an absolute beginner we are going to ignore capitalization for several lessons.
Basic SELECT Statements
When working with Dynamics 365 Finance and Operations, understanding SQL fundamentals is essential for efficient data querying and analysis. But before we begin exploring how to construct and refine select statements to retrieve the information you need, it’s very important that you know how to figure out the fields that you’re going to be using to do something in SQL.
We’ll start with a basic select statement to retrieve records from the sales table.
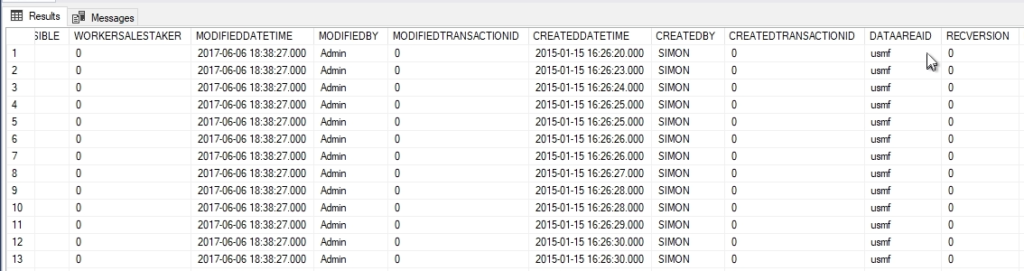
select top 1000 * from salestableprovides a straightforward way to view the first 1000 records in the table, with the asterisk instructing SQL to return all available columns(fields).

However, executing this query reveals an important consideration. The result set will include records from every company in your database, which can make it difficult to analyze data for a specific legal entity. This is where filtering becomes crucial.
To narrow our results to a single company, we introduce “the where clause” to filter by the DATAAREAID field. By adding
select top 1000 * from salestable
When we are writing x++ code later if the table property is set to store data by company
then DATAAREAID is automatically added behind the scenes.
we limit our query to return only records associated with the USMF company. This focused approach ensures we’re working with relevant data for our specific business unit.
Adding Multiple Filter Criteria
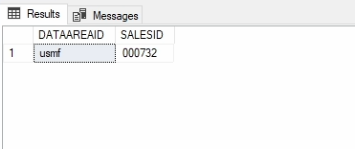
Building on this foundation, we can further refine our query to locate specific transactions. Suppose you need to find a particular sales order. By incorporating an “and statement”, you can add additional criteria to your where clause. The Query
select top 1000 * from salestableallows you to pinpoint an exact sales order within your already filtered company data.
While the asterisk is useful for quickly viewing all available data, in practice you’ll often want to retrieve only specific fields that are relevant to your analysis. Instead of using the asterisk, you can explicitly specify which columns to return by listing them in your select statement. By prefixing each field name with the table name, such as
select top 1000 salestable.DATAAREAID, salestable.SALESID from salestableyou instruct SQL to return only those particular columns. This approach not only improves query performance by reducing the amount of data retrieved but also makes your result set more focused and easier to work with.
Using Table Aliases for Cleaner Code
As your queries grow in complexity, you’ll notice that repeatedly typing the full table name becomes cumbersome and reduces code readability. SQL provides an elegant solution through table aliases, which allow you to assign a shorthand reference to your table names.
Consider our current query:
SELECT TOP 1000 SALESTABLE.DATAAREAID, SALESTABLE.SALESID
FROM SALESTABLE
WHERE SALESTABLE.DATAAREAID = 'USMF'
AND SALESTABLE.SALESID = '000732'
By introducing an alias immediately after the table name in the from clause, we can instead refer to the tablename as the alias.
The refined version becomes:
SELECT TOP 1000 ST.DATAAREAID, ST.SALESID
FROM SALESTABLE ST
WHERE ST.DATAAREAID = 'USMF'
AND ST.SALESID = '000732'
Here, we’ve assigned the alias ‘st’ to the salestable, allowing us to reference it throughout the query using this shorter prefix. Additionally, you can apply column aliases using the ‘as’ keyword
SELECT TOP 1000 ST.DATAAREAID AS LE, ST.SALESID
FROM SALESTABLE ST
WHERE ST.DATAAREAID = 'USMF'
AND ST.SALESID = '000732'
This provides more meaningful column headers in your result set. This practice not only makes your code cleaner and easier to maintain but also improves readability when sharing queries with colleagues.
Why Labels Don’t Match Field Names
D365 uses a layered labeling system that allows the same field to display different labels in different contexts. All fields are based off a datatype.
- Extended Data Type (EDT) – It’s best practices to use an EDT that has its own label. There is an EDT type for each base datatype. For example, the SalesPrice EDT might have the label “Sales Price”.
- Table Field – When that EDT is used in a table, the field can override the EDT’s label. So SALESTABLE.SALESPRICE might override it to say “Unit Price”.
- Form Control – When the field is displayed on a form, the form control can override the label yet again. The same field might display as “Price” on one form and “Unit Cost” on another.
- It’s also worth noting that you can extend all of the above but this is advanced topic that will be covered in later lessons.
This flexibility is powerful for localization and customization, but it makes it challenging to determine what a field is actually called in the database just by looking at the user interface.
The Process for Finding Field Names
Here’s the methodical process we learned to discover the actual field names behind the labels you see:
Step 1: Locate the Field in the User Interface
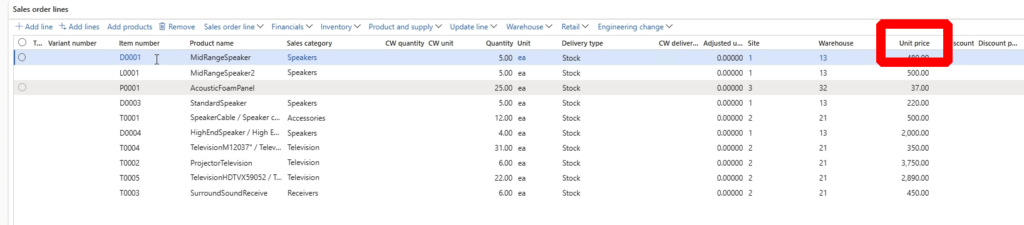
Navigate to the form where you see the field you’re interested in. For example, open a sales order and look at the sales lines grid. Let’s say you want to know what “Unit price” is actually called.
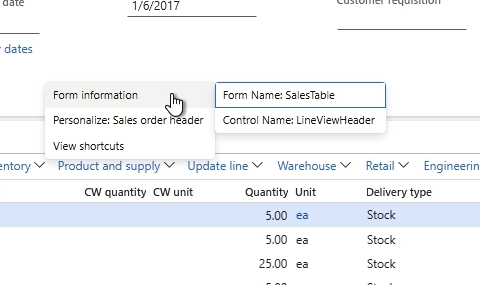
Step 2: Right-Click for Form Information
Right-click on an empty area of the form (not on a specific field yet). This brings up a context menu with an option for “Form information”. Click on it. A dialog will appear showing:
- The form name (e.g., “SalesTable”)
- The menu item that opened the form
- The main query being used
This gives you valuable context about what you’re looking at.
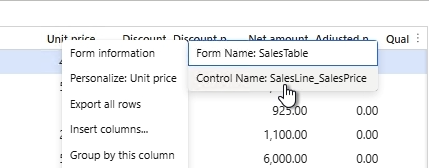
Step 3: Right-Click on the Specific Field
Now right-click directly on the field you’re interested in (in our example, the “Unit price” field). Look for the “Personalize” option and expand it. You’ll see:
- Form name: The name of the form (e.g., “SalesTable”)
- Control name: The name of the control on the form (e.g., “SalesLine_SalesPrice”)
Write down both of these. The control name often gives you a hint about the actual field name, but you can’t fully trust it yet.
Step 4: Open Visual Studio and Use Application Explorer
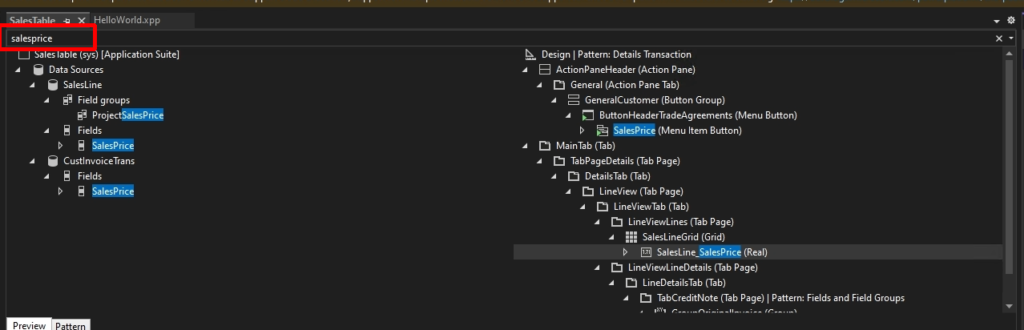
Switch to Visual Studio. On the left side, you’ll see the Application Explorer panel. At the top of this panel is a search box that says “Enter search text”. Type in the form name you found (e.g., “SalesTable”) and press Enter.
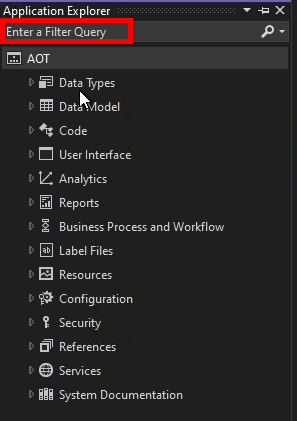
The Application Explorer will search across all objects in the system. You’ll see results for various object types, tables, classes, forms, etc. Look for the entry under “Forms” that matches your form name exactly.
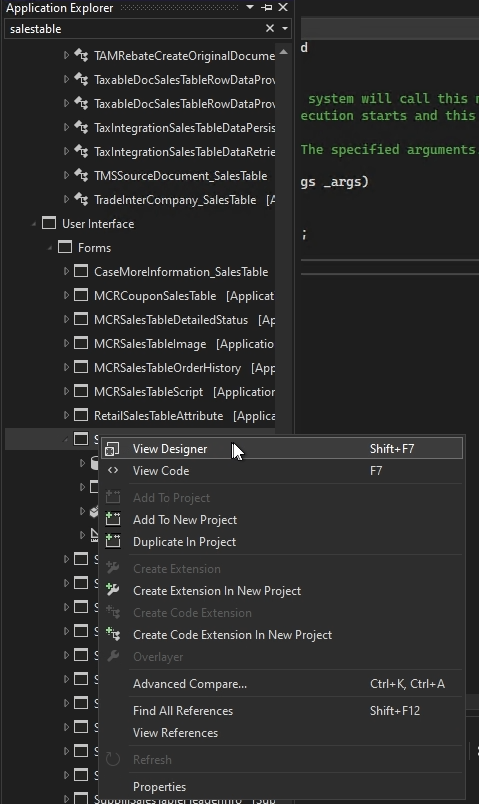
Step 5: Open the Form in Designer
Right-click on the form in the Application Explorer results and select “View Designer”. This opens the form in the designer view, showing you its entire structure in a tree format on the left side of the screen.
Step 6: Locate the Control
In the designer’s search box (usually at the top of the designer panel), enter the control name you found earlier (e.g., “SalesLine_SalesPrice”). The designer will highlight the matching control in the tree structure.
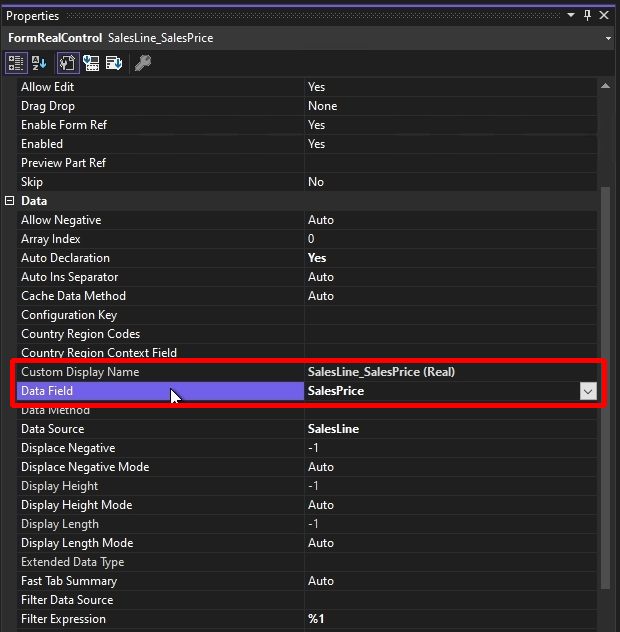
Step 7: View Properties
Right-click on the control and select “Properties”. The Properties window will appear (usually on the right side of Visual Studio). Look for these key properties:
- Data Source: This tells you which table the field is coming from (e.g., “SalesLine”)
- Data Field or Data Method:
- If it says “Data Field”, you’ll see the actual field name here (e.g., “SalesPrice”). This is what you’ll use in SQL.
- If it says “Data Method”, it means the value is calculated by code rather than coming directly from a field, which makes things more complex.
Step 8: Navigate to the Table Field
If you want even more detail, right-click on the control and look for an option like “Go to Table: [TableName]”. Select this option. Visual Studio will jump to the table definition and highlight the specific field.
Now you can see the field’s properties at the table level, including:
- Label: What label is defined at the field level
- EDT (Extended Data Type): The base data type the field is based on
- Other properties like field length, whether it’s mandatory, etc.
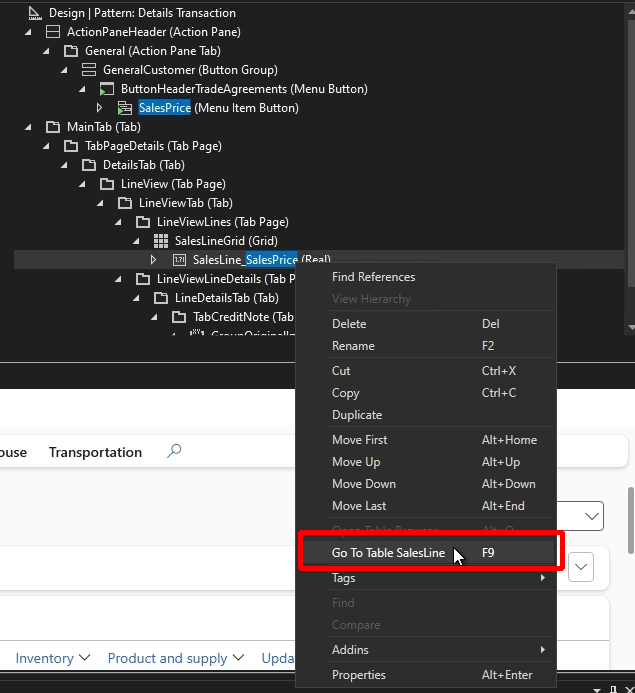
If you want to see where the ultimate label comes from, you can right-click on the field and select “Go to EDT: [EDT Name]”. This takes you to the Extended Data Type definition, where you can see its base label and other properties.
More examples
Let’s walk through a concrete example. Suppose you see “Unit price” on the sales line grid and want to know the actual field name:
- Right-click on “Unit price” → Control name is “SalesLine_SalesPrice”
- Open Visual Studio → Search for “SalesTable” form
- Open form in designer → Search for “SalesLine_SalesPrice” control
- View properties → Data Source: “SalesLine”, Data Field: “SalesPrice”
- Now you know: The field is SALESLINE.SALESPRICE
Your SQL query would reference it as:
SELECT SL.SALESPRICE FROM SALESLINE SL Yes, this process is complex but this becomes second nature with practice. Soon you’ll be able to navigate from the UI to the actual field name in under a minute.
Homework Assignment
Write a SQL query to select the header and lines from a specific purchase order in the USMF company.
Steps to complete this:
- Navigate to a purchase order in the interface
- Right-click to get form information
- Use Visual Studio to find the data sources
- Identify the table and field names
- Write the SQL query with proper joins and DataAreaId filtering
Lesson Summary
This lesson covered an enormous amount of ground:
- Basic SELECT statements and how to use TOP to limit results
- The critical importance of DATAAREAID for company-specific data
- WHERE clauses to filter results
- Table aliases to make queries more readable
- The complex process of finding actual field names behind UI labels
We also jumped between three different applications, SQL Server Management Studio, the D365 user interface, and Visual Studio, learning how each one fits into the development workflow.
You can follow the series on YouTube: https://www.youtube.com/playlist?list=PLkBkUhaE-CdRCUdddCuRBC-cAxGWGtn8Z
You can find even more videos on: https://www.youtube.com/@TRJHTECH
We’ll be releasing lessons regularly, complete with homework assignments and supplemental content. Have questions? Drop them in the comments on any video, your question might even become its own dedicated tutorial!
Leave a Reply