
Welcome back to our series where I teach my best friend Derek how to develop in Microsoft Dynamics 365 Finance and Operations from scratch. In this lesson, we tackled the classic programmer’s rite of passage: building a “Hello World” application. But this isn’t your typical console-based Hello World. This one runs in a web browser and introduces several fundamental concepts you’ll need throughout your D365 development journey.
Before we dive in, I want to emphasize something critical: learning to code isn’t about watching tutorials, it’s about doing. You need to get in there, mess with the code, break things, and work through the problems yourself. If you’re not willing to fail miserably and pick yourself back up, programming simply isn’t for you. The actual learning happens when you’re attempting to solve problems on your own.
Setting Up Your Environment
During this course we will be using some important tools that are built in the VM and we will pin them to the taskbar for easy access:
- Visual Studio – The main IDE (Integrated development environment) for writing X++ code
- Services – For managing D365 services
- IIS (Internet Information Services Manager) – The web server that hosts D365
- SQL Server Management Studio – For database work (we’ll use this later)
Understanding the File Structure
One of the most important concepts is understanding where your code lives. We navigated to:
C:\AOSService\PackagesLocalDirectory\
NOTE: that for cloud hosted development boxes this will likely be on the K: drive and in some cases the J: drive. K:\AOSService\PackagesLocalDirectory\ J:\AOSService\PackagesLocalDirectory\
This directory contains all the Microsoft standard code, organized into models. Each folder represents a model. Here is an oversimplification of what happens when you write code:
- It’s stored in XML files
- A compile (or build) operation converts these to DLL files
- A web service in IIS reads these DLLs
- You access your code through a web browser
If you want a more detailed version of what happens when you build Kurt Hatlevik has a blog post with the details. https://kurthatlevik.com/2024/12/28/d365-behind-the-scenes-of-x-code-compilation-and-runtime/
Managing Services
In the Services application, we identified critical services like Management Reporter 2012 Process Service (for financial reporting). This matter mostly because these services lock files when running. If you need to:
- Restore the database and several other database actions.
- Delete xml model files
- Shut down non crucial services when writing code to improve performance on the box
You’ll need to stop the relevant services first.
The key services we focused on:
- Microsoft Dynamics 365 Unified Operations: Batch Management Service
- Microsoft Dynamics 365 Unified Operations: Data Import Export Framework Service
- Management Reporter Server 2012 (Financial Reports)
- World Wide Web Publishing Service (IIS Express on a cloud hosted dev box)
We stopped these to free up resources during development.
Creating Your First Model and Project
Models in D365 are organizational containers for your code. This allows us to build(compile) only a fraction of the code to test changes instead of having to build the entire application. We created a new model called “TRJH Tech” with these settings:
- Model name: TRJH Tech
- Model publisher: TRJH Tech
- Layer: USR (user layer)
- Version: 1.0.0.0
- Model description: TRJH’s Test Model
Then we created a project within Visual Studio and added our first class.
Writing the Hello World Code
Here’s the actual X++ code we wrote:
class HelloWorld
{
    public static void main(Args _args)
    {
        info("Hello World!");
        warning("Hello World!");
        error("Hello World!");
    }
}
The class declaration “class HelloWorld” creates a new class named HelloWorld. In X++, class names must start with a capital letter and each additional word should be capitalized.
The main method “public static void main(Args _args)
- public: This method can be accessed from outside the class
- static: You can call this method without creating an instance of the class
- void: This method doesn’t return a value
- main: The method name—this is a special entry point method
- Args _args: Parameters passed into the static method (notice the underscore convention)
The Output methods
info(“Hello World!”);
warning(“Hello World!”);
error(“Hello World!”);
These are three different ways to display messages to the user:
- Info: Displays an informational message (blue icon)
- Warning: Displays a warning message (yellow icon)
- Error: Displays an error message (red icon, but doesn’t stop execution)
Something important to have in mind is “error()” is NOT the same as “throw error”. We’ll get to that later.
Different ways to run your code
The first method is by making it the startup object.
We configured Visual Studio to automatically run our code:
1. Right-click the project → Properties
2. Set Startup Object to “Class: HelloWorld”
3. Set Company to USMF (or your preferred company)
4. Click Start (F5)
The web browser opens, and you see a message dialog with your three messages displayed in different colors based on their type.
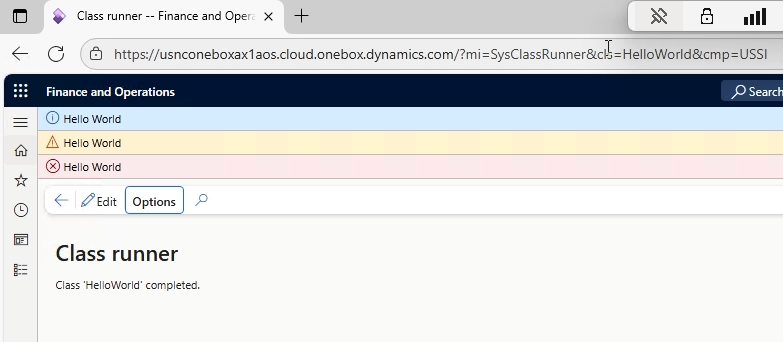
The second method is by using a SysClassRunner URL.
For more control, you can construct a URL to run any class:
https://yourserver/?cmp=USMF&mi=SysClassRunner&cls=HelloWorld
Breaking down this URL:
“cmp=USMF” The company you want to run in
“mi=SysClassRunner” A special menu item that can run any class
“cls=HelloWorld” The name of your class
This method gives you flexibility to run code in different companies without changing your project settings.
Debugging Basics
Breakpoints are markers you place on specific lines of code that tell the program to pause before executing that line. Think of them like stop signs. When your code hits a breakpoint, it stops running so you can examine what’s happening at that exact moment. This lets you check variable values, see what data is being processed, and verify your code is doing what you expect before it continues to the next line.
Setting a Breakpoint
I highly recommend watching the video tutorial to see breakpoints in action. Seeing the debugger pause, step through code line-by-line, and display real-time variable values makes the concept click much faster than reading about it. The visual demonstration will give you a much clearer understanding of how powerful this tool really is!
Key Takeaways
- Environment setup is crucial, know where your tools and services are
- Models are organizational containers for your code stored in PackagesLocalDirectory
- The main() method with Args parameter is a standard entry point for runnable classes
- Three message types: info(), warning(), and error() for different severity levels
- Two ways to run code: Startup Object in Visual Studio or SysClassRunner URL
- Debugging lets you step through code line-by-line and inspect variables
- error() ≠ throw error() – One displays a message, the other throws an exception related to try/catch an advanced topic we will cover later
You can follow the series on YouTube: https://www.youtube.com/playlist?list=PLkBkUhaE-CdRCUdddCuRBC-cAxGWGtn8Z
You can find even more videos on: https://www.youtube.com/@TRJHTECH
We’ll be releasing lessons regularly, complete with homework assignments and supplemental content. Have questions? Drop them in the comments on any video, your question might even become its own dedicated tutorial!
Leave a Reply