
Welcome to the updated guide for setting up a local D365FO virtual machine (vm) known as a “Onebox”. This guide contains all the details you need to know including prerequisites and hardware requirements. Much of this information comes from Alex Meyer’s blogpost, but Microsoft has since changed the user interfaces and renamed products. This guide represents the changes after the rename of Azure Active Directory to Microsoft Entra and is demonstrated on the 10.0.43 version of Microsoft Dynamics Finance and Operations.
What’s a onebox?
A ONEBOX includes all necessary components to run D365 Finance and Operations on a single box. These major components are the Application Object Server (AOS), SQL Server, IIS(url hosting), batch service, and import export framework. This setup is primarily used for development and testing purposes, allowing developers to build, debug, and customize solutions locally without needing access to a full cloud-hosted environment.
Prereq/Requirements:
To set up your local Dynamics 365 Finance and Operations OneBox environment, you’ll need a few key accounts and licenses in place:
- Microsoft Account with Entra Access
First, make sure you have a Microsoft account that can access Microsoft Entra ID (formerly Azure Active Directory). You’ll use this to create an App Registration in the Azure portal. This registration generates a unique Application ID, which is essential for creating certificates within your OneBox VM. You’ll also need to run a configuration tool to assign your account as an administrator. Once these steps are complete, you’ll be able to authenticate into the D365FO application using OAuth with your Microsoft credentials. - Visual Studio License for Development
If you plan to do any development work, a valid Visual Studio license is required. The OneBox VM includes a 30-day trial license, but there is a catch. The trial starts from the date the OneBox files were uploaded to the LCS asset library, not when you first boot up the VM. So if you’re setting up the environment more than 30 days after the upload, the trial will already be expired. You can sign up for your own free trial to get started, but for long-term use, consider joining the Microsoft AI Partner Program. Personally, I registered my company through the program and purchased a package that gave me eight Visual Studio licenses. If you’re a freelance consultant like I am, this route is significantly more cost-effective than buying yearly licenses, and it comes with added perks like Office, Teams, and other Microsoft tools. - Microsoft Server License
The OneBox also includes a free 3-month trial license for Windows Server. And yes, just like the Visual Studio trial, this countdown begins from the moment the OneBox files are uploaded to the LCS asset library, not when you start using it. Fortunately, Microsoft provides a command-line tool that lets you extend the trial a few times “slmgr -rearm“. In most cases, Microsoft releases a refreshed OneBox image before you exhaust all your extensions, so you can simply update to the latest version and reset the clock.
Software/Hardware requirements:
Software Requirements
The only essential software you need is a virtualization platform that can run virtual machines in the .vhd format. Everything else, including the Dynamics 365 application, development tools, and the Contoso demo database, is already pre-installed on the OneBox image.
I personally use Hyper-V, which is available on:
- Windows 10/11 Professional
- Windows 10/11 Enterprise
- Windows Server editions
You may need to enable Hyper-V. Here is a tutorial on how to do that.
If you’re using a version of Windows that doesn’t support Hyper-V (like Home editions), you’ll need an alternative. A good option is VMware Workstation Pro, which, at the time of writing, is free for personal use.
Hardware Requirements
According to Microsoft’s official guidance (2022), here are the baseline specs:
| Use Case | CPU Cores | RAM (Allocated to VM) |
| Non-development | 2 cores | 16 GB |
| Development | 4 cores | 24 GB |
From my own experience, if you’re planning to do serious development work, I recommend allocating at least 30 GB of RAM to the VM. Personally, I upgraded my machine to 64 GB of RAM and allocate 46 GB to the OneBox. If your system can’t spare that much, be sure to limit SQL Server’s memory usage to around 7 GB, otherwise, it can easily balloon to 14+ GB under heavy load. I recommend NOT using dynamic memory because it will take much longer to load all the startup services for Microsoft Dynamics 365 Finance and Operations.
Storage Requirements
Plan for at least 350 GB of free disk space.
- The final .vhd file itself takes up around 260 GB
- Before that, you’ll need to download three .rar files and one .exe to extract the VHD. These files vary by version but typically range from 35 GB to 80 GB combined
Make sure your storage drive has enough headroom to handle both the download and the extracted VM image.
Downloading the OneBox VM
Go to LCS Sign in using your Microsoft account.

Once you’re logged in, you’ll land on the Lifecycle Services (LCS) homepage.
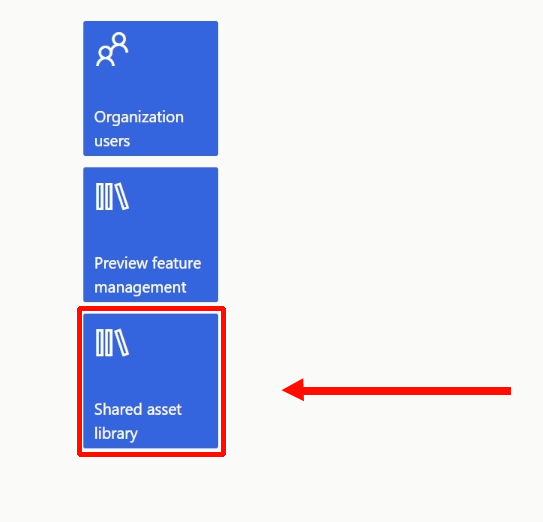
Open the Shared Asset Library On the left-hand menu, click on Shared Asset Library. Be patient, it may take a few minutes to load, as Microsoft shares a large number of files here.
To begin setting up your local Dynamics 365 Finance and Operations virtual machine, follow these steps to download the OneBox image:
Find the Downloadable VHD Section Once the asset library finishes loading, click on Downloadable VHD. This section lists all available OneBox VM versions.
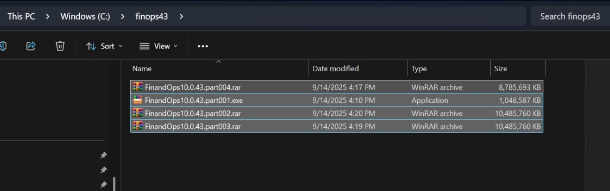
Choose Your Version For this tutorial, we’ll be using version 10.0.43. Locate it in the list and download all four required files:
– Three .rar archive files.
– One .exe extraction tool
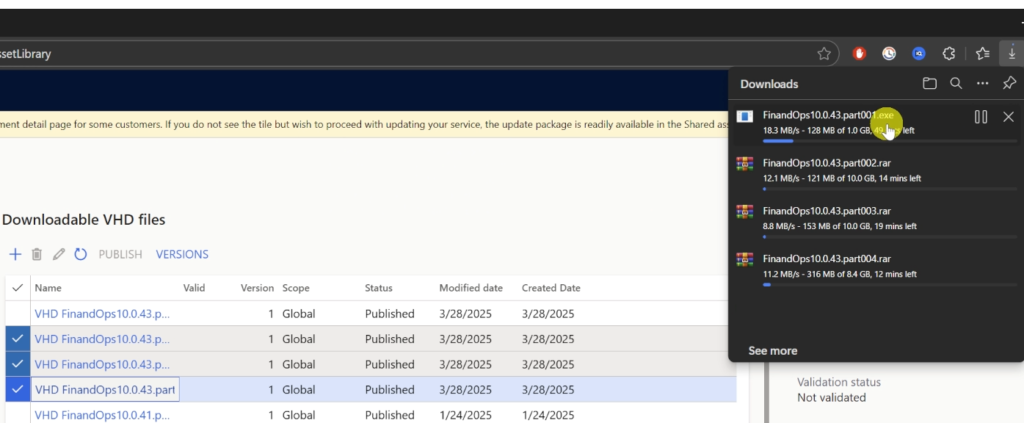
These files combined will generate the full .vhd image you’ll use to run the virtual machine. File sizes vary by version, but expect a total download size between 35 GB and 80 GB.
DO NOT UNZIP THE .RAR FILES!!!!!!!!
Preparing the Folder for Your OneBox Files
Before extracting the OneBox VM files, you need to create a dedicated folder on your C:\ drive, and configure it properly to avoid issues when running the VM in Hyper-V.
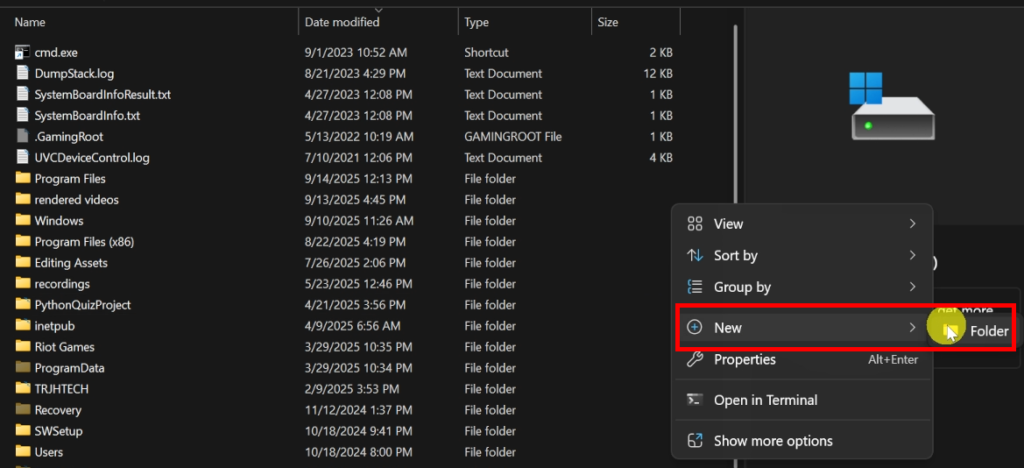
Create a Folder Open File Explorer and create a new folder on your C:\ drive (e.g., C:\finops43).
Check Folder Properties Right-click the folder and select Properties. In the Properties window, click the Advanced button.

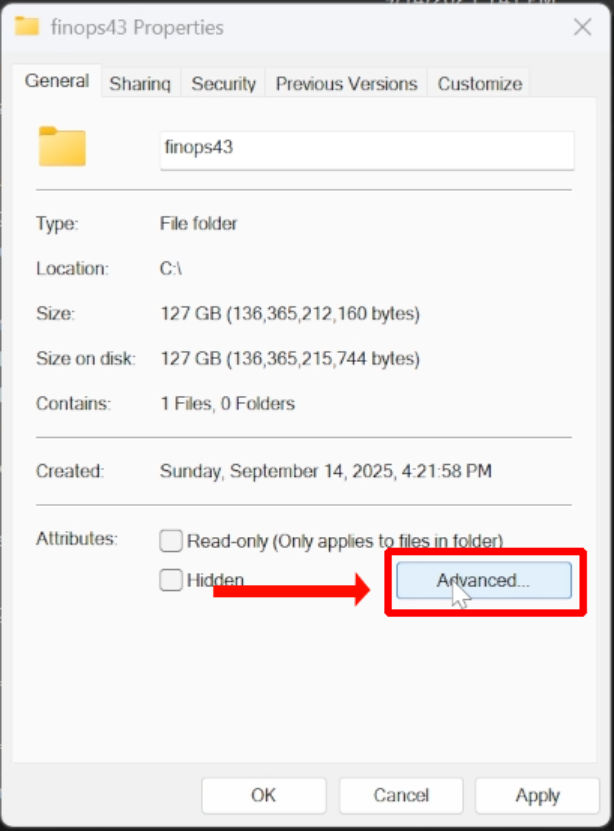
Disable Compression and Encryption In the Advanced Attributes dialog, make sure both of the following options are unchecked:
Compress contents to save disk space
Encrypt contents to secure data
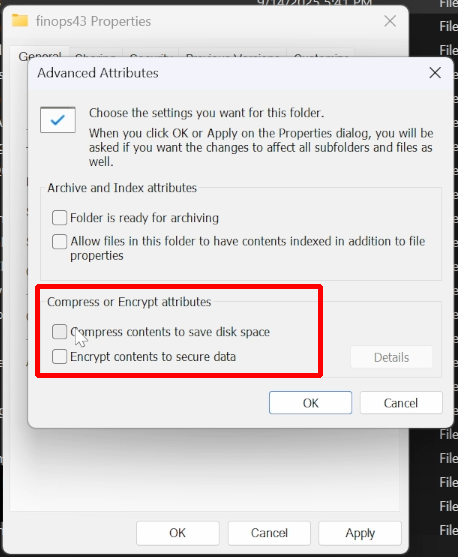
These settings must be disabled, if either is enabled, Hyper-V will fail to run the virtual machine in the later step. This is a common pitfall that can lead to cryptic errors and wasted time.
Apply Changes Click OK, then Apply, and confirm that the settings apply to all files and subfolders (even though the folder is still empty).
Extracting the OneBox VHD File
Now that you’ve downloaded the four required files, it’s time to extract the virtual hard disk, but do not manually extract the .rar files. This step must be done using the provided .exe file to ensure everything is stitched together correctly.
- Move All Files to Your Prepared Folder Place all three .rar files and the .exe file (e.g., FinandOps10.0.43.part001.exe) into the folder you created earlier,such as C:\FinOps43.
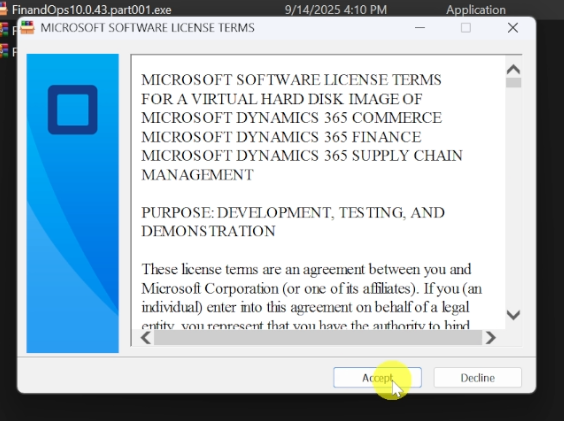
- Run the .exe File by double-clicking FinandOps10.0.43.part001.exe. Accept the software license terms when prompted.
- Choose the Destination Folder The default extraction path should match the folder where your files are already located (e.g., C:\FinOps43). Confirm the path and click Extract.
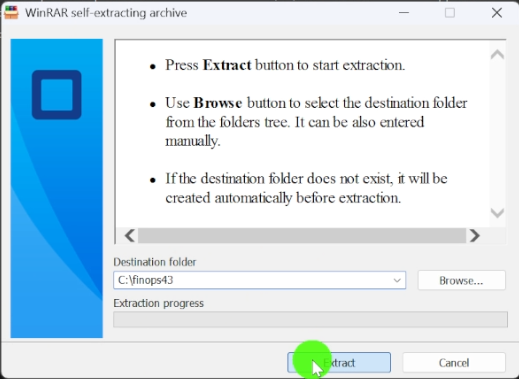
- Wait for the Extraction to Complete The process may take several minutes depending on your system. Once finished, you’ll see a new .vhd file in the folder—this is your virtual machine image.
- Clean Up You can now safely delete the .rar files to free up space. Don’t forget to empty your Recycle Bin—those files still occupy disk space until permanently removed, and you’ll need every gigabyte for the VM to run smoothly.
Creating the Virtual Machine in Hyper-V
With your .vhd file ready, it’s time to set up the virtual machine in Hyper-V. Follow these steps carefully to avoid common pitfalls:
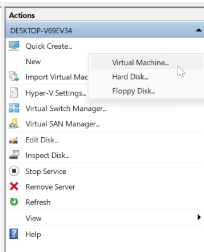
- Open Hyper-V Manager Launch Hyper-V and go to the Actions pane on the right. Click New > Virtual Machine to start the setup wizard.
- Begin the Wizard Click Next on the “Before You Begin” screen.
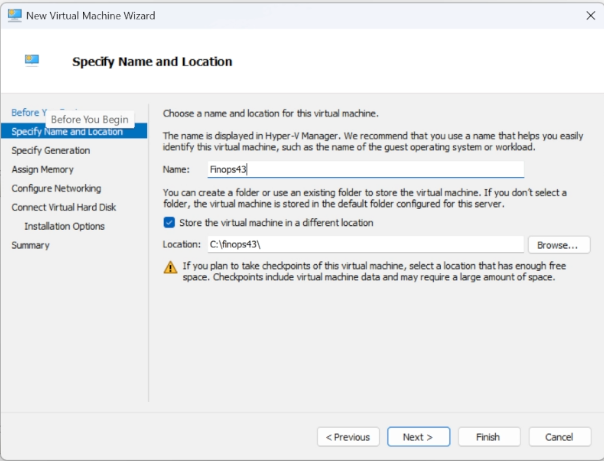
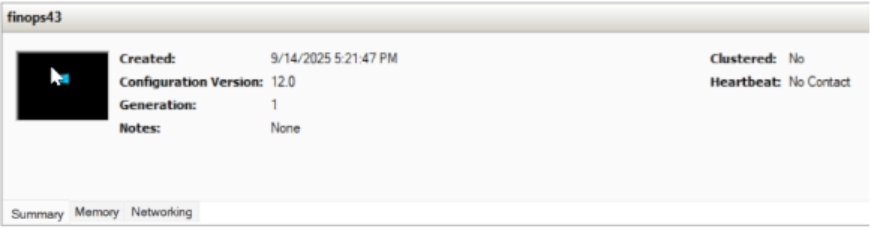
- Name Your VM Enter a name for your virtual machine, let’s call it Finops43. ✅ Check the box “Store the virtual machine in a different location” and set the path to the folder you created earlier (e.g., C:\FinOps43). Click Next.
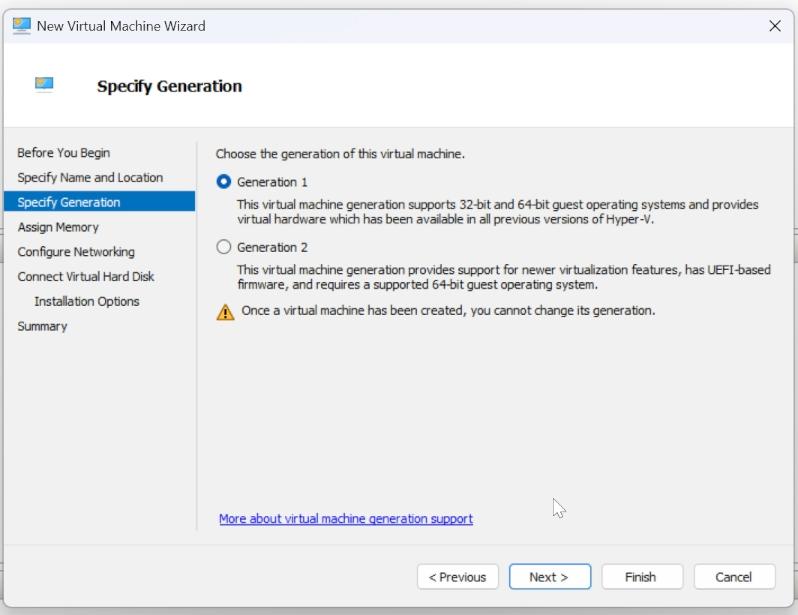
- Specify Generation By default, the wizard selects Generation 2, but .vhd files are NOT COMPATABLE with Gen 2 VMs. Select Generation 1 and click Next.
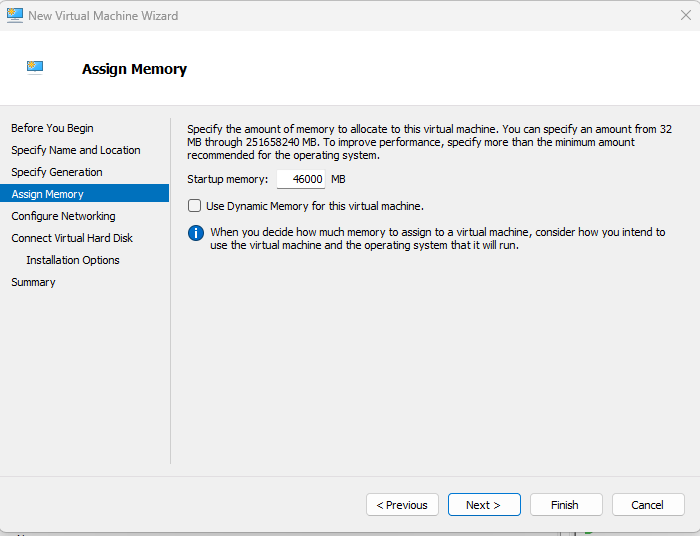
- Assign Memory Choose how much memory to allocate based on your system’s capacity. For development, 30 GB or more is ideal, but you can adjust this to fit your hardware. You will want to uncheck “Use Dynamic Memory for this virtual machine”. If you enable the ‘Dynamic Memory’ option when creating your virtual machine, Hyper-V will automatically adjust the amount of RAM allocated to the VM based on its current workload. Rather than reserving a fixed amount of memory, the virtual machine will start with a minimum allocation and scale up or down as needed. This will slow down the start of your VM. Once unchecked Click Next.
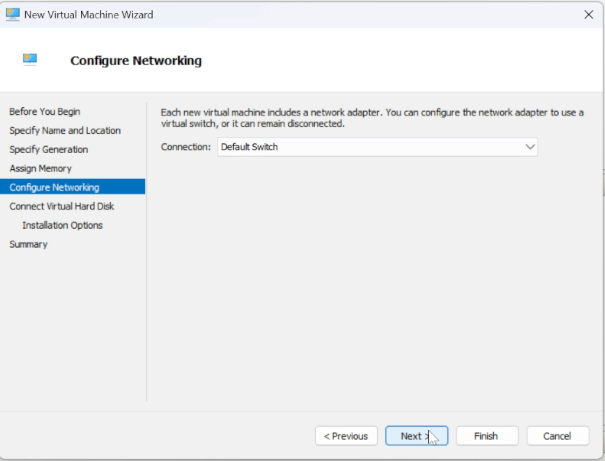
- Configure Networking For the connection, select Default Switch. Click Next.
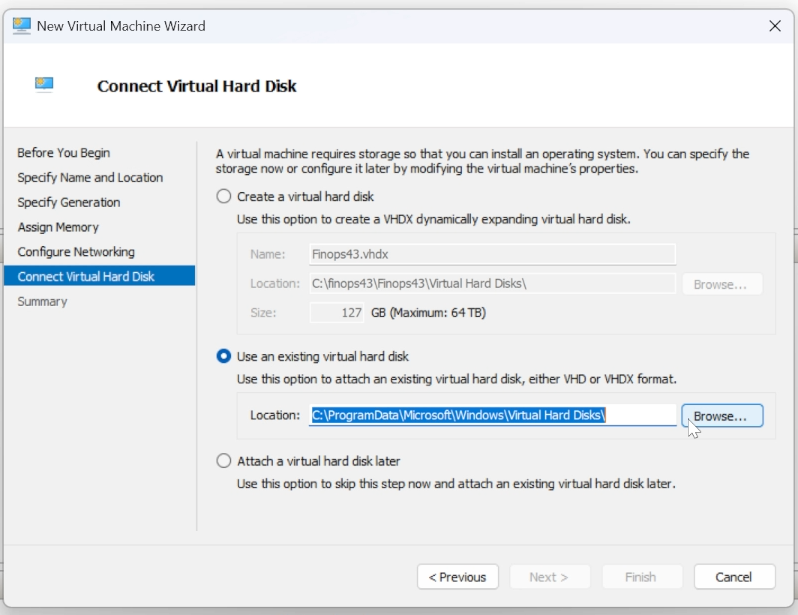
- Connect the Virtual Hard Disk You’ll be given three options:
- Create a virtual hard disk
- Use an existing virtual hard disk
- Attach a virtual hard disk later
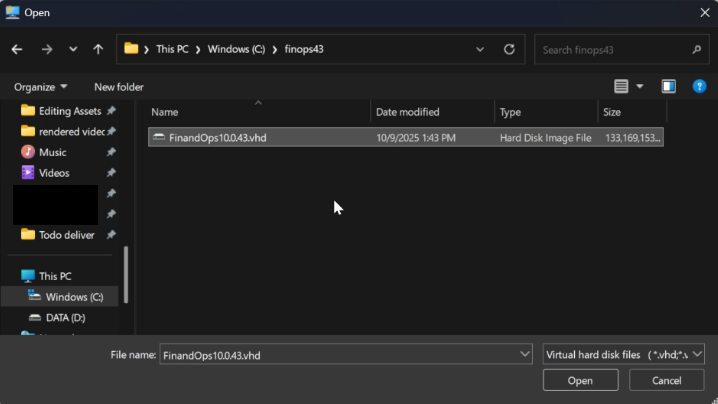
✅ Choose “Use an existing virtual hard disk” and browse to the .vhd file you extracted earlier in your folder. Click Next.
- Finish Setup Review your settings and click Finish. Hyper-V will now create your VM using the selected configuration.
Starting the VM and Registering in Microsoft Entra
With your OneBox VM configured in Hyper-V, it’s time to power it on and connect it to your Microsoft Entra ID (formerly Azure Active Directory).
Start and Access the Virtual Machine.
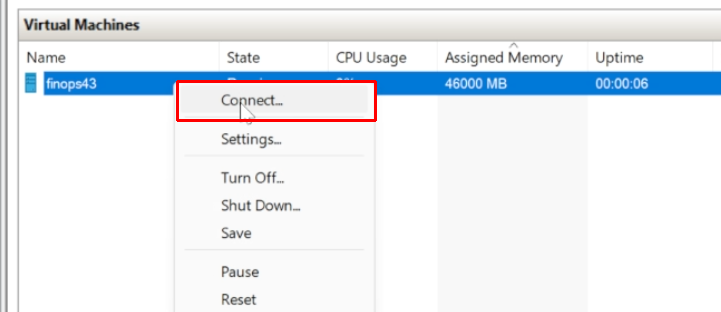
Start the VM In Hyper-V Manager, right-click your VM (e.g., Finops43) and select Start.
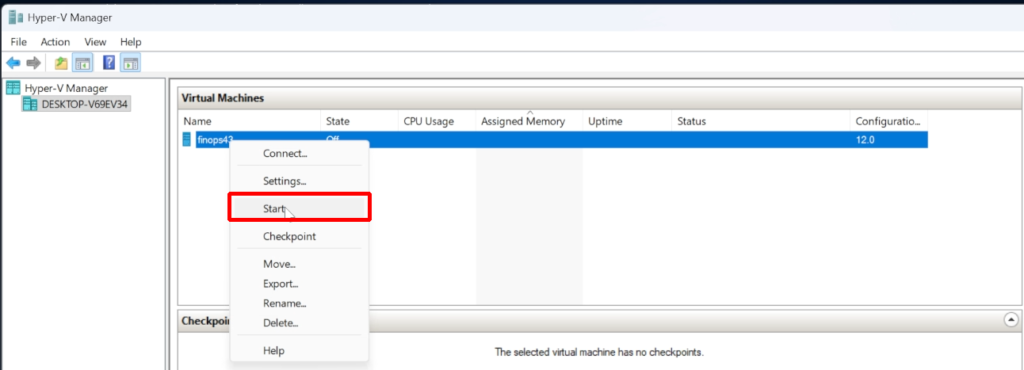
You’ll see a small preview of the boot process in the summary panel.
Connect to the VM Right-click the VM again and choose Connect. A new window will open, giving you full access to the virtual machine.
Resize the Window (Optional) You’ll be prompted to resize the display. Choose the resolution that works best for your screen and comfort.
Log In Use the default credentials
- Password:
pass@word1
Registering the VM in Microsoft Entra
Now that the VM is running, we need to register it in Microsoft Entra to enable OAuth-based authentication for Dynamics 365. You will also use the application Id to generate authentication certificates on the Onebox.
Go to the Azure Portal and click Sign In.

If you’ve signed in before, you should be redirected to the Azure Portal automatically.
If you are not redirected, enter your Microsoft credentials to proceed.
Access Microsoft Entra ID At the top of the Azure Portal homepage, under Azure Services, click on Microsoft Entra ID.

Create a New App Registration In the left-hand menu, click App registrations
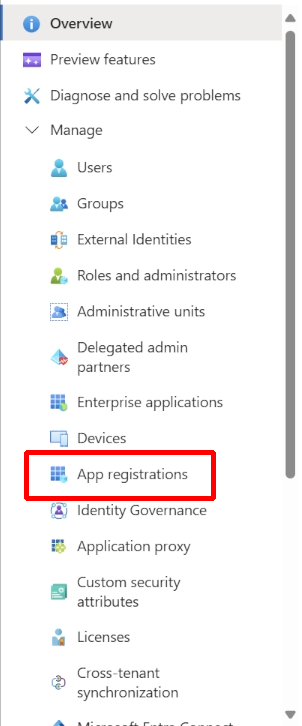
then select + New registration.

Fill Out the Registration Form

Name: Enter a display name for your app (e.g., Jamesfinops43). You can choose any name you like. I recommend having the version number in the name.
Supported account types: Select the option that fits your setup. For most users, this will be Single tenant (My organization only).
Redirect URI: Set the type to Web and enter the following URL: https://usnconeboxax1aos.cloud.onebox.dynamics.com/

Register the App Click Register to complete the process. You’ll now have an App Registration that you’ll use to configure certificates and enable secure login to your D365FO environment.
Generating Certificates & Setting Up Admin Access
With your app registered in Microsoft Entra, it’s time to link your OneBox VM to that registration and assign yourself as the admin user. This step ensures secure authentication and gives you full access to the Dynamics 365 environment.
Generate Self-Signed Certificates
- Copy Your Application (Client) ID From the Azure Portal, copy the Application (client) ID from your newly registered app.

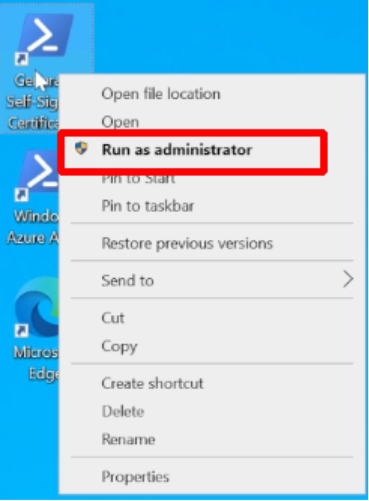
- Run the Certificate Generator On your VM’s desktop, locate the shortcut named Generate Self Signed Certificates.
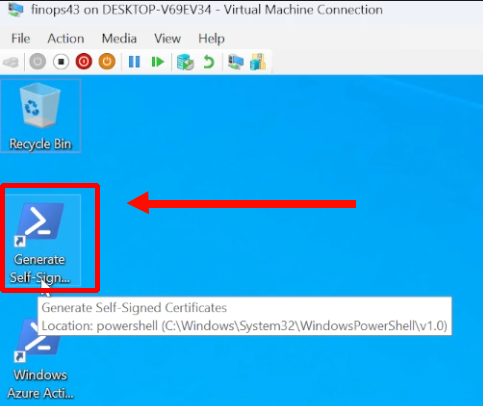
Right-click it and choose Run as administrator.
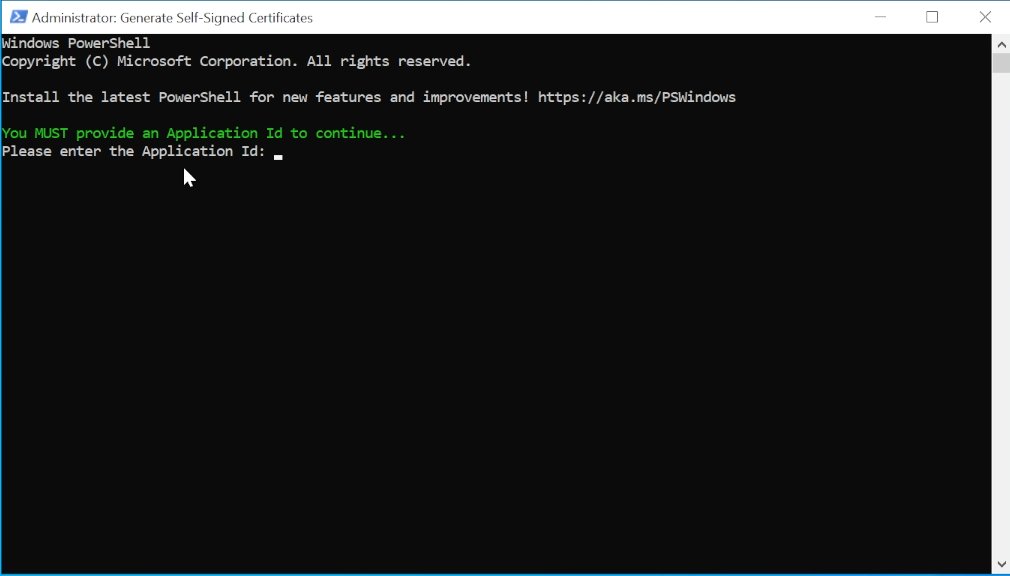
- Paste the Application ID When prompted, press CTRL + V to paste your Application ID and hit Enter.
- Respond to Certificate Prompt The tool will ask if you already have a certificate for this Application ID. Type N and press Enter.
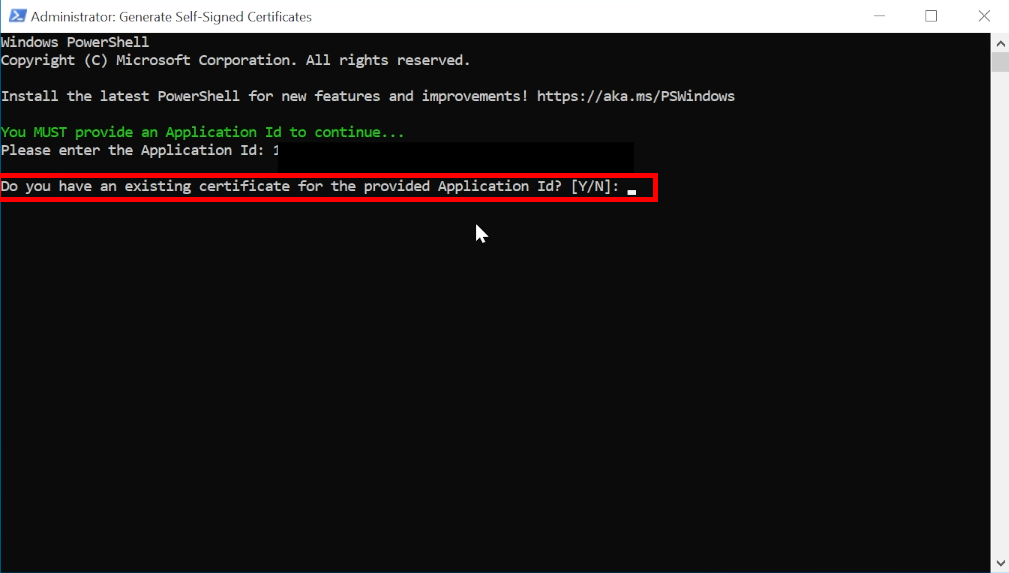
- Let the Tool Run The script will generate the necessary certificates, stop all related services, and restart them automatically. Once complete, you can close the command window.
Provision Yourself as Admin
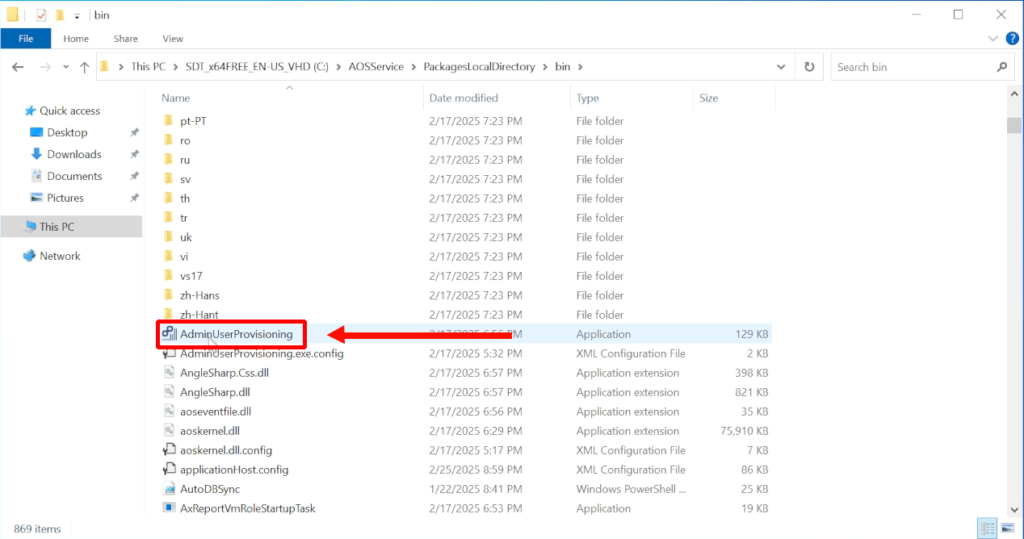
- Navigate to the File Explorer and go to: This PC > C:\AOSService\PackagesLocalDirectory\Bin
- Scroll down and locate the application named “AdminUserProvisioning”. Right-click it and select Run as administrator.
- Fill Out the Form
- Provider: AAD-Global
- Email Address: Use the email tied to your Windows account (the same one used in Azure)
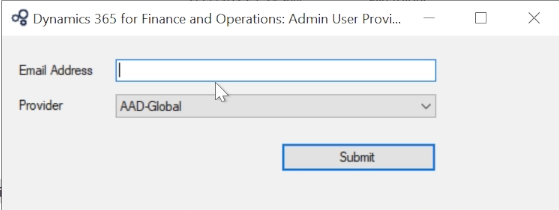
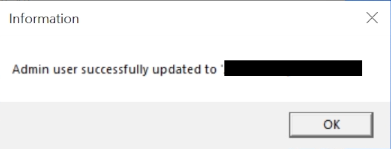
- Submit and Confirm Click Submit. This may take several minutes to run and then you will see a confirmation message: “Admin user successfully updated to [your email]”
How to extend windows server evaluation period.
To extend your Windows Server evaluation period, follow these steps:
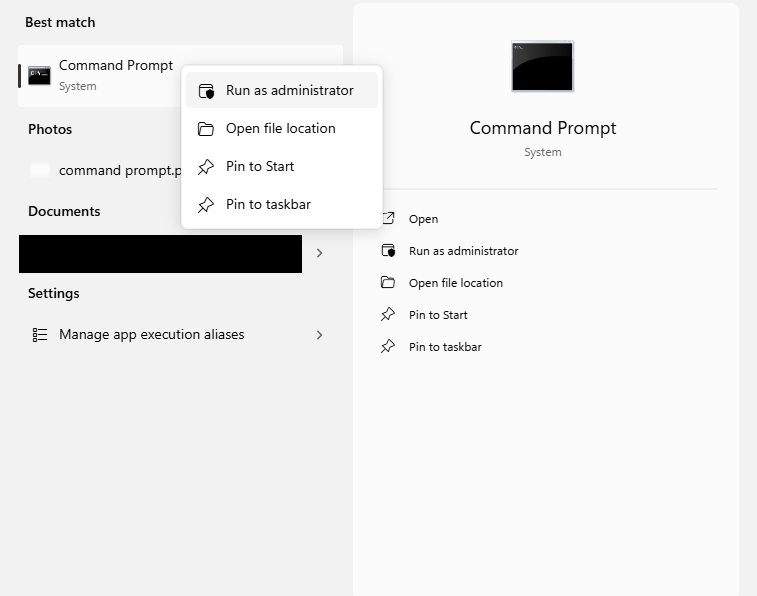
Click on the windows start button on your task bar and search “Command prompt” Then right click it and click run as administrator.
Type the command slmgr -rearm and press Enter.
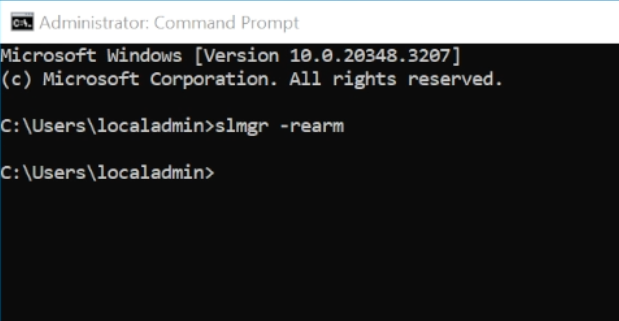
A dialog box will appear confirming that the command completed successfully.

Restart your virtual machine for the changes to take effect.
I hope this guide helped you successfully set up your local Dynamics 365 Finance and Operations OneBox environment. Whether you’re diving into development, testing customizations, or just exploring the platform, having a local VM gives you the flexibility and control to learn and build at your own pace.
If you found this tutorial useful, consider sharing it with others who might benefit, and if you’d rather follow along with a video walkthrough, you can watch the full setup on my YouTube channel: TRJHTECH https://www.youtube.com/@TRJHTECH
Thanks for reading, and feel free to drop your questions or feedback in the comments. Happy building!
Leave a Reply